Category: Code

Add a ‘Recent Applications’ stack to your Apple Dock

I’ve never been one to leave things well enough alone. If it can be modified, edited, and personalized…I’m going to do just that. One helpful trick I’ve picked up since using a Mac is the ability to add customized stacks to the dock. A lesser known feature, however, is the ability to add a Recent Applications tile stack.

Below are two screenshots showing my current desktop. The first shot shows my mouse hovering over the Recent Applications stack and the second shows the stack expanded.

Recent Applications Stack

Recent Applications Stack2

Unfortunately, there is not User Interface (UI) for getting this helpful menu. So we’re relegated to adding the menu via the command line. Enter Terminal.

For the uninitiated, the Mac OS is built on a UNIX kernel–you can read more about that at Wikipedia. There are many benefits to having a *nix kernel beneath the OS (in my humble opinion)–one of which is the ability to easily run command line actions. Windows has a command prompt (Start / Run / ‘cmd’) but I find it very jailed and not as powerful as a *nix based command line. Anywho, I digress. In OS X, one access the command line via the Terminal application. (On a sidenote, Terminal runs a bash shell.

You can find Terminal.app in your /Applications/Utilities/ folder. Simply double click on it to open. Once there, enter the following command to tell the OS to add the Recent Applications stack to your dock:

defaults write com.apple.dock persistent-others -array-add '{ "tile-data" = { "list-type" = 1; }; "tile-type" = "recents-tile"; }'

You may want to copy and paste the command from here so you don’t make a mistake. Once you paste the command, simply press enter. After doing this, you have to ‘reboot’ the dock for the change to take place. To restart the dock, you could reboot your machine, but since you already have Terminal open, you can run one more command to restart the dock without rebooting your machine. Simply type the following and press Enter:

killAll Dock

After you enter that command, the Dock will reboot and you’ll see your new stack…except it will be empty. The OS hasn’t been tracking ‘recent applications’ for the dock because until now, that stack didn’t exist. To populate the list, simply open a few apps. By default, the stack will show the 10 most recent apps.

Finally, once the stack is in place, you can right click on it and change the behavior from recent applications to other recent things such as documents, servers, or favorite items and volumes.

Oh, and for those of you who don’t know what to do with terminal: Type ‘exit’ to make sure you don’t have anything going on and them simply quit the app (Terminal / Quit Terminal) from the menubar or simply Apple-Q (⌘Q).

So you rooted your Android…Now what?

Let me begin by saying that I’m pretty new to Android rooting as well. I typically work in LAMP stacks and mobile development and tweaking is something I’ve only been doing for a few months now. Having said that, if you’re comfortable in *Nix environments, you won’t have any trouble.

Image courtesy of xkcd

Disclaimer

“Rooting your phone will void your warranty, damage your reputation as an upstanding member of society and maybe even insult your family. In no way, shape or form do we condone any action that goes against the principles of any agreement that you might have signed to not modify your phone’s software. Read further at your own risk.” –TNW

Anywho, this isn’t an article about why you should or shouldn’t root. If you’re here, you’ve probably already rooted or, at least, already decided it’s for you. This article assumes you’ve just rooted and you’re not sure what to do next.

Am I rooted?

The first question I had after I rooted my Droid Incredible (which was stock 2.2 OTA) was, “Uhm, did it work?” After rooting, the phone goes through a process of reboots which takes 5-7 minutes in all. (I was surprised, I assumed the rooting process would take longer.)

The quickest way to test for ‘root’ is to simply open up your Apps folder and see if a new app called ‘Superuser Permissions’ shows up. It has a picture of a ninja. If you see this, you’re rooted! Congratulations!

So, what’s next?

So you know that root has its benefits, but what should you do first? My opinion will vary from others, but then again you’re reading my blog, so you asked for it. 🙂

I would most certainly download Clockwork’s ROM Manager and perform your first nandroid backup. (Huh?) A nandroid backup is an exact file system copy of your phone (think .iso or CCC). It allows you to restore your phone (apps, settings, preferences, etc.) to that state in the future should you need to. It’s a good idea to have this ‘stock’ backup in case you FUBAR your phone with your newly granted Root rights and need to revert. There are plenty of instructions out there on how to Backup/Restore your phone using ROM manager.

Another Backup?

I also suggest people immediately download Titanium Backup (donate version) and backup their system & preferences with it as well. This may be redundant, but it also allows you to restore individual apps & settings in the future, should you need to.

Finally, if you haven’t already, download Appbrain’s app to your phone, create a free account, and sync your apps. If for some reason you lost your backups and has to reflash a stock ROM, you would lose all your settings but at least you could re-install all of your apps easily.

Next steps

So, now you’re all backed up. You probably want to start removing Bloatware and other preinstalled apps. In my opinion, Titanium Backup is the best option here. Once you donate, you get a Key to unlock features such as ‘freezing’ apps. While some apps can easily be deleted (Nascar on Sprint, Skype & VZNavigator on Verizon), others don’t like to be removed. Some applications like Friendstream.apk are used by other apps like Twitter and Facebook. For this reason, using TB to ‘Freeze’ these apps (basically renaming them to prevent them from loading) is a better option. This way they’re still on the phone if you decide you want to reenable them later.
(I actually mistakenly deleted FriendStream after my first root thinking that it was Footprints.apk. I had to reflash from my nandroid and then go through it all again; it cost me 3 hours or work but I was sure glad I had the nandroid!)

What about Wifi tethering?

Yes, after backups and removing bloatware, free wifi tethering is one of the greatest things about having a rooted device. Carriers charge between $20 and $30/month for 3G hotspot capabilities which seems erroneous since most smartphone plans make concessions for unlimited data.

There are a few ways to use free 3G hotspot (wifi tethering) and a Google search will bring you more info than what I can share. I will insert a few links to make things easier though:
Wireless Tether for Root (pre8) – This seems to be the crowd favorite right now for app-based tethering.
Verizon EPST hack – If you’re on Big Red, you may also want to read about this EPST hack. It’s fast, simple, and doesn’t require root or a 3rd party app. (Of course, I don’t condone breaching your contract, so only read about this. Never do it. Right Big Red?)

Next steps

So, you’re rooted, backed up, surfin’ the web for free…anything else? Of course! You’re just getting started. Lots of cool apps out there require root to run. A few of my faves include:

  • Screen Shot It: This app allows you to take those cool screen shots of your screen that you see when checking out forums. This particular one is paid, but allows for cropping and ‘shaking’ to capture. Great app.
  • Root Explorer: Also a paid app, this file explorer is granted SU access and can remount the drive from Read-Only to Read-Write quickly and easily. Very useful.

Closing Remarks

I hope this “What to do now that you’re rooted” guide helps. It certainly isn’t intended to be a How To guide of any sort…more like a roadmap for where to go next. Keep in mind that if you have a stable nandroid backup, you can experiment a good bit. Be careful what you uninstall and create new nandroid backups when you reach a point where you like your current build (i.e. after you remove bloatware and install your rooted apps.) It’s also a good idea to copy your nandroids off your SD card to your computer from time-to-time for safer storage.

Further reading

I didn’t get into the benefit of custom ROMs etc. in this short article; there are PLENTY of other write-ups out there on that topic. Here are a few other reads for you if you wanna dive in further.

Need more help?

If you still need help, many great supporters can always be found in the #unrevokedtest channel on Freenode IRC. Join from your favorite IRC client or via the web. I can typically be found under the handle “idowens”.

Easy WordPress Client Management via Command Line

I’ve had a WiredTree VPS for about 3 months now. In addition to hosting about 5 of my personal sites on it, I also host a few family members blogs and some pro-bono stuff I’ve done for past clients.

Anytime I get ready to create a new account on the VPS (which, in turn, creates its own cPanel account just as if one had purchased a shared hosting account) I always dread the next step of downloading the latest version of WordPress, grabbing the latest copies of what I consider ‘base-install plugins’ (that is, plugins that I always include in a WordPress installation. These include Absolute Privacy, Google Analyticator, All-in-One SEO Pack, Next-Gen Photo Gallery, WP-Optimize, WP Super Cache, Google XML Sitemap Generator, Contact Form 7, and Akismet.) [Note: I don’t always activate all of these in each build, but I do like to have them handy if I need them. In today’s ‘Unlimited Storage Space’ environment, these small plugins don’t get in the way.]

After going through this download, unzip, upload, and activate process about a hundred times, I figured there had to be an easier way. Yes, I know you can auto-install plugins (and even WordPress, via Fantastico or Softaculous) but I don’t pay for either of those two auto-installers on my VPS because, well, I don’t need them. Plus, I run my PHP as DSO on my VPS rather than suPHP, so there can easily be permissions issues since I run all processes as the ‘nobody’ user.

So, I began thinking…couldn’t I download the latest WordPress build, download the lastest plugin versions I want, put the plugins, extracted, in the wp-content/plugins folder and even toss in a few ‘Coming Soon’ or ‘Maintenance Mode’ themes in the wp-content/themes/ folder. Then, when I create a new account, I could just explode the zip file into the newly created public_html directory and the only manual process I would have to go through would be setting up the MySQL database and editing the wp-config. file–a process which I can now due in under 5min.

Well, that’s exactly what I did. I created the folder I wanted and zipped it up. Then I dropped it on my VPS in a high level folder and tried exploding it into a directory. What I noticed was that, since I had zipped things on my Mac and then uploaded to a Linux box, I had the nasty _MACOSX folders in each directory…making the zip file larger than it needed to be AND making things convoluted.

I did a bit of Google research and found that I just needed an archive utility that would zip ‘Windows Friendly’ files which simply excludes those Mac folders. There were several programs out there, but I settled on one called YemuZip for it’s simplicity and cost (free!). It has a simple drag-and-drop interface that worked perfectly.

I deleted the ugly directory I created the first time using the fantastic “$ rm -rf /ugly-directory” command, uploaded the newest zip and exploded it. This time, it worked like a charm. I quickly tied it to a database I had standing by and was able to log in, with themes & plugins intact, in a matter of seconds.

This process certainly beats the heck out of downloading WordPress each time and and then subsequently downloading plugins. Below, I’ll share the Linux commands for accomplishing this.

How to do it

Once you’ve created your zip (using a program like YemuZip if you’re on a Mac!), upload your wordpress.zip file to a neutral folder on your server. (By neutral, I simply mean a higher level folder that isn’t likely to be deleted…something like /home/.)

Then, you’ll want to ‘explode’ (uncompress) the zip file to a directory on your server.

You’ll need to have navigated to the directory where your recently uploaded wordpress.zip lives.For me, that means logging into my VPS via Terminal (SSH) and the using the bash command:

cd /home/

…which simply tells the server to ‘change directory’ (cd) to the /home/ folder. Then, you have two options for inflating: (1) you can pre-create the destination folder or (2) you can tell the command line to create it for you. I typically follow the latter, so my code looks like this:

unzip wordpress.zip -d /home/USER/public_html/destination

That “-d” tells Linux to create the referenced directory, “destination”, even though it doesn’t exist. If you’re inflating to a folder that already exists, you’ll simple leave off the -d.

The server-side explode takes about 2 seconds and then everything is ready for you to start configuring. In my opinion, this is the fastest way of quickly installing WordPress, fully configured, on a new server. (There are also config files you can include in your install to further personalize things, but I avoid those in most cases unless I’m setting up 5+ sites for the same client. You can Google that topic for more info.)

If you’re interested, I’ve included my latest ‘wordpress.zip’ here for you to download. All the plugins & core files are up-to-date as of the date of this post and it includes WP v. 3.0. I hope you find it useful. FYI: The unzipped folder is 18.6 MB. The zipped file is 6.0MB…another pro of uploading the zip to the server and inflating it there rather than the other way around.

Download pre-built WordPress.zip.

Do you have any tips or tricks for making things easier that I haven’t thought of? Please share you tips with us! Oh, and for what it’s worth, I also delete the “Hello Dolly” plugin…you would think Matt and the team would have gotten rid of this by now…


Add Max Width to WordPress Image Uploads

The core WordPress media manager does a pretty good job of helping folks to automatically manage their images. Depending on your setup, WordPress will look for the GD Image Library on the server (you can also set it to ImageMagick if you prefer…like I do) and resize your images, auto-create thumbnails, and perform other neat on-the-fly chores that would take awhile to do if you blog a lot.

The later versions of WordPress will take a large image and create 4 different images once you upload it: a thumbnail, small, medium, and large, along with the original. You can then select which image you would like to insert into your post.

Over the past two weeks, I’ve been helping my Mother move from a Blogger blog to a new WordPress blog. She had been wanting the ability to have a wider “content” area and wanted a fresh new look. So, we found her a template that would work well for her and I modified it to fit her needs.

One of the issues we had, once we launched her new blog was image sizing. Sometimes she’ll upload images from her digital camera (which are really large) and other times she’ll grab smaller images from a Google search to include in her posts. It was confusing to her to not have all the size options each time she uploaded an image. See, if a photo is relatively small when you upload it, you won’t get the options for a small or medium image, only the original. Conversely, if a very large image is uploaded and she chooses ‘large’ or ‘orginal’ it may be too wide for the content area and essentially ‘break’ the layout.

Fortunately, there is a simple solution. Locate your theme’s main functions.php file (typically found in the theme’s root directory), and add the following after the opening < ?php:

$GLOBALS['content_width'] = 800;

This will set the maximum width for uploaded images to 800 pixels. You may, of course, adjust as necessary. Now, when my Mom uploads an image, she always knows to choose the ‘original’ option, because it will never be ‘too large’ for the content wrapper…of course, she doesn’t know that this piece of code is in place…she just knows that it works. And, as they say, ignorance is bliss.

Redirecting Visitors on Unix Servers

There are many times when one may wish to redirect a visitor on his or her site. Say for example you used to have your blog a yourdomain.com/blog but now you want it in the root; you could redirect all traffic from the /blog directory back to the root / directory. Or, perhaps you’re moving to an entirely new domain; you could redirect all traffic from one domain to another. Like the first example, if you used to have webpages in a subfolder (like, /articles/article1.html) and you change your structure directory, you could redirect traffic from /articles to /entries.

One could come up with hundreds of reasons to redirect traffic and since there are so many reasons to redirect, there are a handful of ways to accomplish the redirection. The easiest and cleanest method is by editing your .htaccess file. The .ht (or, hypertext) access file is a directory-level configuration file that allows for “decentralized management of a web server1.” Incidentally, the file begins with a dot (.) because this is the default ‘hidden’ mode for *Nix servers. Anywho, the .htaccess file can do a lot of stuff and is very powerful, so always make a backup when editing the file and don’t erase things you find when you get there…always append, or prepend, and add a comment about what the code is meant for. (See #4 on Donnie’s list…in fact, read them all while you’re there.)

A few mote notes about .htaccess:

  • Always transfer your .htaccess file to the server is ASCII mode; binary will mess it up and could cause your server to operate incorrectly.
  • If you can’t see your .htaccess file, make sure your FTP server is set show hidden files. Also, as mentioned before, you won’t find this file on a Windows server…*Nix only. You can always try uploading abc.htacccess.txt and then renaming it once it’s on the server to simply “.htaccess” if you’re having trouble.

301 Redirect

To move a single page:

Redirect 301 /oldpage.html http://www.example.com/newpage.html

To move your whole site:

Redirect 301 / http://www.example.com/

What if you’ve changed your site from .html extensions to .php or vice versa? The following will help you redirect one extension to another on the server-side; it looks for any .html extension and changes it to .php:

RedirectMatch 301 (.*)\.html$ http://www.example.com$1.php

Other Methods

Remember at the beginning of the article when I said that editing the .htaccess file was the “clean & easy” way of redirecting? Well, not everyone has access to their .htaccess file so there is an alternate method. You can *gasp* use a meta redirect.

Search engines don’t like meta redirects and most people don’t either. They’re clumsy and they’re not bullet-proof like the .htaccess method. Either way, it can be used in a pinch. For this method, we’ll open the index.html or index.php file (or header file, if you’re using SSI) and add a few lines of code:


<meta http-equiv="refresh" content="10; url=http://example.com/">

The content=”10;  tells the browser how many seconds to wait before redirecting…you could easily change this to meet your needs.

Final Notes

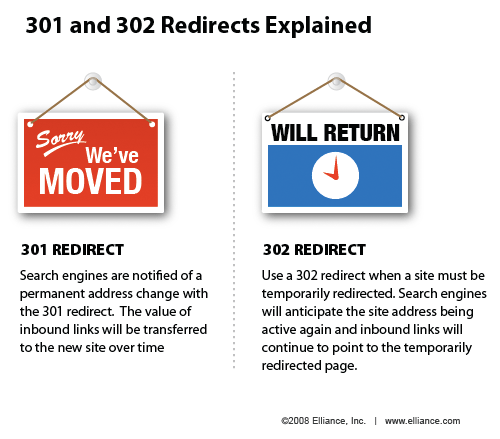
All of my notes above have the intent of creating 301 redirects, as opposed to 302s. A 301 redirect is meant to be a permanant change. If Google and other spiders see a 301 redirect in place, they will begin updating their records accordingly.

Conversely, if you create a 302 redirect, you don’t lose your search engine friendliness. Here’s a helpful image to help you see the difference:

So, there ya go; a quick run down on redirecting visitors on a *nix box. Any questions?