I’m a big fan of the Plex Media Server and run it on my 2011 MBP which sports an i7 processor and can transcode multiple streams simultaneously. The only drawback to this is that my MBP must remain on, running PMS for me to stream files on my local machine, Fire TV, Samsung Smart TV, or Android devices. While not a deal breaker, it would be nice to offload the PMS to another device and free up my MBP.
First, I thought about investing in the new NETGEAR Nighthawk X10 – AD7200 802.11ac/ad Quad-Stream MU-MIMO WiFi Router with 1.7GHz Quad-core Processor & Plex Media Server wireless router which has PMS baked in (or, at least the ability to download and enable it via the firmware.) While $500 is expensive for any router, it would be fairly future proof as it supports the new 802.11ad standard (though most consumer devices can’t connect to this yet.)
While investigating, I came across a helpful article on the Plex Support forums which, among other things, confirmed my fears that rather than using the most recent, stable Linux build of PMS, it would be a proprietary app which must be approved by Netgear & made available via their firmware. This is essentially the difference between getting a the latest Android OS the day it is made available on phones like the Nexus or Pixel while having to wait for other manufacturers (HTC, LG, Motorola) and or networks (Verizon, AT&T) to bake in their apps & support which usually equates to a 2-5 month lag time in getting the update.
This ended up being the deal breaker for me as Netgear isn’t in the business of distributing apps, to my knowledge. Additionally, the X10 router is a flagship product for Netgear and as such, I imagine they hope to make more of a media/news splash than actually sell & support that particular model for the long-term.
Since buying a router to use as a PMS didn’t seem like the right approach (at least, not until it’s more refined), I decided to look into building a standalone PlexBox…an always-on computer directly connected to the router via a CAT6 cable and connected to my 6TB media NAS via USB 3.0. In short, it would be something akin to an older LanBox, but with a CPU capable of pushing multiple transcodes.
Plex readily shares that in order to transcode a 1080p/60 FPS stream, one needs a CPU Passmark score >2000. Passmark scores are benchmark ratings based on individual user submissions of their CPUs compared with hundreds of others and give a good benchmark of how well a particular system (CPU) will perform.
As of late 2015, results showed that:
- Bottom 25% of machines are in the range of 0 – 1050
- Middle 50% of machines are in the range of 1051 – 2940
- Top 25% of machines are in the range of 2941 – 6100
To get a jumping off point, I wanted to know what my current Early 2011 MBP CPU clocked in at. Unfortunately, the “About this Mac” screen is limited to showing only the type & speed of processor and not the specific chipset. Mine looks like this:

Since this doesn’t tell me the exact chipset, I searched the web for a way to pull the exact chipset ID. I found a helpful website which gave me a simple command-line entry to return my chipset ID. By opening Terminal and entering the following code, you’ll be returned your Mac’s specific chipset ID:
sysctl -n machdep.cpu.brand_string
My results were:
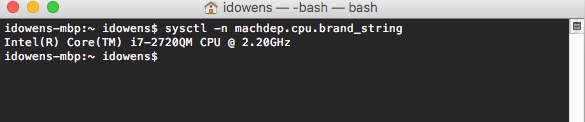 Aha! Now I knew I had an Intel i7-2720QM chipset clocked at 2.20GHz. With this, I could plug in my chipset at Passmark and get my specific Passmark score:
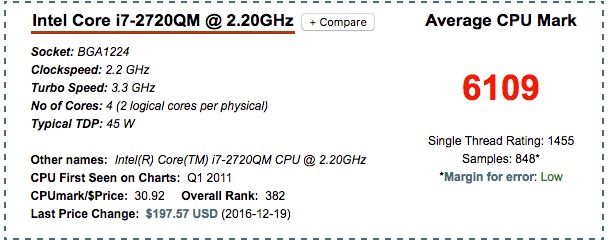
With a score >6100, that puts my CPU in the top 20% of all CPUs (not bad for an early 2011 model.) I also bought the “Cadillac” of MBPs back in 2011 in order for it to be as future-proof as possible. Even with an upgraded RAM to 16Gb, I can tell you it’s starting to show its age.
Since my i7 needs to multitask, push several displays, keep multiple applications open simultaneously, and occasionally do high-end rendering or run a Virtual Machine, it makes sense to have a high-end CPU. However, for building a PlexBox, I wondered if I could get away with a lower-end chipset and save some big bucks since all I’m asking the box to do it keep PMS running. Apart from an active transcode (2 at the most), the box won’t be running any other software and won’t have an active display connected to it (I’ll be remoting in, when needed.)
Using the Plex Standard of >2000 Passmark score for 1080p/60 FPS transcodes, I began looking into less expensive chipsets and came across the Intel Core i3-6100 @ 3.70 GHz. This chipset is much newer and has an incredibly close passmark to the much older i7 I currently have:
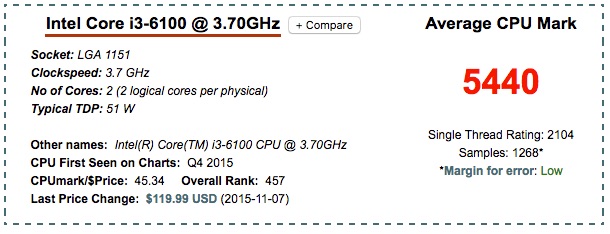
A comparison of these two (helpfully provided by Passmark) shows that the dual-core i3 is almost as powerful as my older i7 (due to how the chipsets have advanced in the last 5 years). It’s also about $90 cheaper, depending on the marketplace. Also, since the i3 comes with an onboard CPU cooler (which is sufficient as I won’t be overclocking it), I won’t need to spend an extra $30-50 on an external CPU cooler, which makes the total cost of ownership ~$140 less than buying the i7.
With a CPU selected, I still needed to select RAM, an HDD, a power supply (PSU), the all-important motherboard, and finally a case to house it all. Fortunately, I ran across an incredibly helpful site called PCPartPicker which allows you to start with any one component and build out other components based on what will fit / match what you have currently selected. Using this tool, I was easily able to select the additional components I needed. As a plus, their site also checks current prices from popular marketplaces like Amazon, NewEgg, OutletPC, Jet, and others and even factors in available rebates to help you find the lowest price. If you create an account, you can also save your build and get a permalink to the build to share with others; here’s mine.
After reading reviews on their site for multiple components I needed, I believe I’ve settled on the following choices:
PCPartPicker part list / Price breakdown by merchant
As you can see, for under $350, I’ll be able to put together a solid PlexBox with multiple USB 3.0 ports, and HDMI output (if I want to plug a monitor in for local viewing), and since I’ll be running an Open Source linux distribution, there are no additional costs for an Operating System.
I look forward to any feedback on my build. I’ll post an update here once I get the components assembled and migrate my PMS database to the new system. Happy Building!

