In my day job, I work a lot with WordPress and lately we’ve been utilizing a VPS or Dedicated server for more labor-intensive needs when shared hosting won’t cut it. Further, this site you’re reading now, along with about 8 others I own, are currently hosted on a VPS I’ve had for about 6 months now.
During this time, I’ve learned a lot about server management from the Linux command line, WHM (Web Host Manager, for the uninitiated), and cPanel. Below are just a few of the more helpful things I’ve learned along the way.
WHM vs. cPanel
If cPanel is the user interface for managing you hosting account, think of WHM as the user interface for managing all of your cPanels. Most people won’t ever see/use WHM because with most shared hosting accounts, you don’t get WHM access. However, as soon as you purchase a VPS or Dedicated server, you’ll be provided WHM as a way to manager all of your sites on the server. Resellers are very used to WHM as they use it to manage their clients.
WHM doesn’t allow you to do anything you can’t do from the command line & an FTP client but it sure does make it easier and faster. The WHM interface is very cPanel-esque and once you learn where the main things are, it’s pretty simple.
~tilde access for temporary site access
One of the great things about setting up a shared hosting account and registering a new domain name is the fact that most hosts give you immediate access via the IP address followed by “/~account_name”. When I first began using my VPS, I noticed that this helpful option is turned off by default.
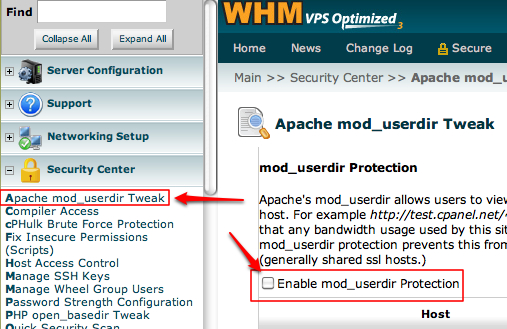
Turning it on is a really simple procedure. Basically the Apache module mod_userdir needs to be enabled. To do so, log into WHM, open the ‘Security Center’ tab in the sidebar, and click the first option, ‘Apache mod_userdir Tweak.’ Once there, uncheck the ‘Enable mod_userdir Protection’ box and viola! your /~username conventions will now work.

A note from the cPanel user manual: “Disabling this is desirable, as the bandwidth used when the site is accessed using this method is attributed to the web host’s main domain, skipping bandwidth monitoring systems.”
Whitelist IP addresses
When setting up a new site, or constructing one for a client, it’s not unusual to hit (that is, access) a site several hundred times an hour (esp. if you’re awful at CSS like me and need to refresh a lot.) Default firewalls are typically set to quickly lock users out for what looks like ‘spam’ OR if you happen to forget a password and attempt to login with the wrong credentials more than a few times.
To prevent this, it’s a good idea to quickly whitelist your IP address (at home and work) as well as any potentials clients who will be accessing the site a lot. To do do, go to the very bottom of the WHM sidebar and open the Plugins option, then ‘ConfigServer Security & Firewall’. Once there, look for the Green box that reads ‘Quick Allow’. Simple enter your IP addresses here, one by one, and click Quick Allow. You can also use wildcards here.

Set recursive php.ini location
Over and over, WordPress plugins require more that 8, 16, and even 32MB of PHP memory to run. Many hosts limit the ceiling of PHP memory allowed to 32 or 64MB (Midphase upped one of my accounts to 96MB upon request, but it took getting in touch with a System Admin. for the concession and I got a strong warning that if more than 7 processes used 96MB simultaneously, my account would be subject to suspension.)
Anywho, without getting into the details of the PHP.ini file and why it needs to be modified (that’s another post), in order to be truly useful, the newly created .ini file needs to be placed in EVERY directory on the server. That can be really tedious for many reasons. (1) It’s a pain to place it in every directory and (2) to make a change, one has to replaced it every directory. Fortunately there’s a solution that makes use of your .htaccess file.
Most WordPress users will only be familiar with their .htaccess file as it relates to their permalink structure as this is the file WordPress writes to for mod_rewrite rules. The .htaccess, among other things, is useful to creating permanant 301 redirects, custom rewrite rules, and setting the location of a ‘global’ .ini file.
I use the term ‘Global’ loosely as the VPS or Dedicated server’s PHP.ini file has the ‘ultimate’ ceiling defined but a local .ini file can up your limits to the max of what is allowed. So ‘global’ is the local sense. Confusing, I know.
Back to the helpful part: Rather than placing this file in every directory, simply place your PHP.ini file in a central locale and then add the following line to your .htaccess file:
SetEnv PHPRC /location/todir/containing/phpinifile
Notice that the command does NOT link to the actual .ini file but rather the directory in which the .ini file resides. Setting this value makes it easy to change, keeps you from having to place the .ini file in every directory, and finally, some areas in WordPress work much better with this line defined (For example, the Media Upload tool often doesn’t recognize an upload limit that has been raised from the 8MB initial limit to a newly defined 32MB.)
Closing remarks
These are just a few tips I’ve picked up in the last few months. When I have time, I’ll try to write a follow up article dedicated solely to the best practices for .htaccess files & PHP.ini files.