Category: Technology

Finding your Mac’s exact CPU model

I’m a big fan of the Plex Media Server and run it on my 2011 MBP which sports an i7 processor and can transcode multiple streams simultaneously.  The only drawback to this is that my MBP must remain on, running PMS for me to stream files on my local machine, Fire TV, Samsung Smart TV, or Android devices. While not a deal breaker, it would be nice to offload the PMS to another device and free up my MBP.

First, I thought about investing in the new NETGEAR Nighthawk X10 – AD7200 802.11ac/ad Quad-Stream MU-MIMO WiFi Router with 1.7GHz Quad-core Processor & Plex Media Server wireless router which has PMS baked in (or, at least the ability to download and enable it via the firmware.) While $500 is expensive for any router, it would be fairly future proof as it supports the new 802.11ad standard (though most consumer devices can’t connect to this yet.)

While investigating, I came across a helpful article on the Plex Support forums which, among other things, confirmed my fears that rather than using the most recent, stable Linux build of PMS, it would be a proprietary app which must be approved by Netgear & made available via their firmware. This is essentially the difference between getting a the latest Android OS the day it is made available on phones like the Nexus or Pixel while having to wait for other manufacturers (HTC, LG, Motorola) and or networks (Verizon, AT&T) to bake in their apps & support which usually equates to a 2-5 month lag time in getting the update.

This ended up being the deal breaker for me as Netgear isn’t in the business of distributing apps, to my knowledge. Additionally, the X10 router is a flagship product for Netgear and as such, I imagine they hope to make more of a media/news splash than actually sell & support that particular model for the long-term.

Since buying a router to use as a PMS didn’t seem like the right approach (at least, not until it’s more refined), I decided to look into building a standalone PlexBox…an always-on computer directly connected to the router via a CAT6 cable and connected to my 6TB media NAS via USB 3.0. In short, it would be something akin to an older LanBox, but with a CPU capable of pushing multiple transcodes.

Plex readily shares that in order to transcode a 1080p/60 FPS stream, one needs a CPU Passmark score >2000. Passmark scores are benchmark ratings based on individual user submissions of their CPUs compared with hundreds of others and give a good benchmark of how well a particular system (CPU) will perform.

As of late 2015, results showed that:

  • Bottom 25% of machines are in the range of 0 – 1050
  • Middle 50% of machines are in the range of 1051 – 2940
  • Top 25% of machines are in the range of 2941 – 6100

To get a jumping off point, I wanted to know what my current Early 2011 MBP CPU clocked in at.  Unfortunately, the “About this Mac” screen is limited to showing only the type & speed of processor and not the specific chipset. Mine looks like this:
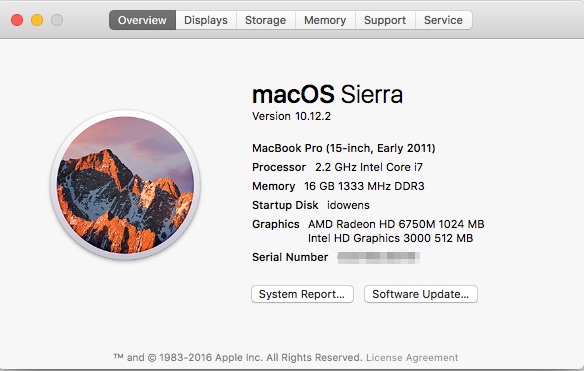
Since this doesn’t tell me the exact chipset, I searched the web for a way to pull the exact chipset ID. I found a helpful website which gave me a simple command-line entry to return my chipset ID. By opening Terminal and entering the following code, you’ll be returned your Mac’s specific chipset ID:

sysctl -n machdep.cpu.brand_string

My results were:

Aha! Now I knew I had an Intel i7-2720QM chipset clocked at 2.20GHz.  With this, I could plug in my chipset at Passmark and get my specific Passmark score:
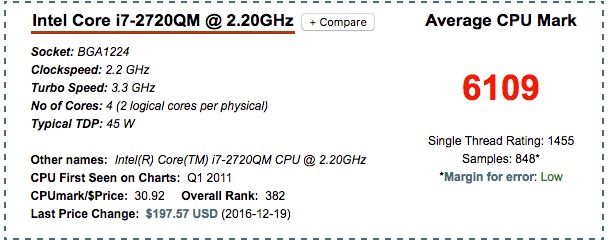
With a score >6100, that puts my CPU in the top 20% of all CPUs (not bad for an early 2011 model.) I also bought the “Cadillac” of MBPs back in 2011 in order for it to be as future-proof as possible. Even with an upgraded RAM to 16Gb, I can tell you it’s starting to show its age.

Since my i7 needs to multitask, push several displays, keep multiple applications open simultaneously, and occasionally do high-end rendering or run a Virtual Machine, it makes sense to have a high-end CPU.  However, for building a PlexBox, I wondered if I could get away with a lower-end chipset and save some big bucks since all I’m asking the box to do it keep PMS running. Apart from an active transcode (2 at the most), the box won’t be running any other software and won’t have an active display connected to it (I’ll be remoting in, when needed.)

Using the Plex Standard of >2000 Passmark score for 1080p/60 FPS transcodes, I began looking into less expensive chipsets and came across the Intel Core i3-6100 @ 3.70 GHz.  This chipset is much newer and has an incredibly close passmark to the much older i7 I currently have:
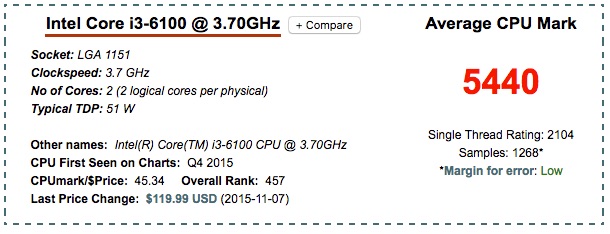
A comparison of these two (helpfully provided by Passmark) shows that the dual-core i3 is almost as powerful as my older i7 (due to how the chipsets have advanced in the last 5 years). It’s also about $90 cheaper, depending on the marketplace. Also, since the i3 comes with an onboard CPU cooler (which is sufficient as I won’t be overclocking it), I won’t need to spend an extra $30-50 on an external CPU cooler, which makes the total cost of ownership ~$140 less than buying the i7.

With a CPU selected, I still needed to select RAM, an HDD, a power supply (PSU), the all-important motherboard, and finally a case to house it all. Fortunately, I ran across an incredibly helpful site called PCPartPicker which allows you to start with any one component and build out other components based on what will fit / match what you have currently selected. Using this tool, I was easily able to select the additional components I needed. As a plus, their site also checks current prices from popular marketplaces like Amazon, NewEgg, OutletPC, Jet, and others and even factors in available rebates to help you find the lowest price.  If you create an account, you can also save your build and get a permalink to the build to share with others; here’s mine.

After reading reviews on their site for multiple components I needed, I believe I’ve settled on the following choices:

PCPartPicker part list / Price breakdown by merchant

Type Item Price
CPU Intel Core i3-6100 3.7GHz Dual-Core Processor $109.99 @ SuperBiiz
Motherboard Gigabyte GA-H110M-A Micro ATX LGA1151 Motherboard $52.88 @ OutletPC
Memory Crucial 8GB (1 x 8GB) DDR4-2133 Memory $41.99 @ Jet
Storage Samsung 120GB 2.5″ Solid State Drive $58.49 @ Jet
Case Cooler Master N200 MicroATX Mini Tower Case $40.99 @ NCIX US
Power Supply SeaSonic 350W 80+ Bronze Certified ATX Power Supply $44.99 @ SuperBiiz
Prices include shipping, taxes, rebates, and discounts
Total $349.33
Generated by PCPartPicker 2016-12-28 21:48 EST-0500

As you can see, for under $350, I’ll be able to put together a solid PlexBox with multiple USB 3.0 ports, and HDMI output (if I want to plug a monitor in for local viewing), and since I’ll be running an Open Source linux distribution, there are no additional costs for an Operating System.

I look forward to any feedback on my build. I’ll post an update here once I get the components assembled and migrate my PMS database to the new system. Happy Building!

So you rooted your Android…Now what?

Let me begin by saying that I’m pretty new to Android rooting as well. I typically work in LAMP stacks and mobile development and tweaking is something I’ve only been doing for a few months now. Having said that, if you’re comfortable in *Nix environments, you won’t have any trouble.

Image courtesy of xkcd

Disclaimer

“Rooting your phone will void your warranty, damage your reputation as an upstanding member of society and maybe even insult your family. In no way, shape or form do we condone any action that goes against the principles of any agreement that you might have signed to not modify your phone’s software. Read further at your own risk.” –TNW

Anywho, this isn’t an article about why you should or shouldn’t root. If you’re here, you’ve probably already rooted or, at least, already decided it’s for you. This article assumes you’ve just rooted and you’re not sure what to do next.

Am I rooted?

The first question I had after I rooted my Droid Incredible (which was stock 2.2 OTA) was, “Uhm, did it work?” After rooting, the phone goes through a process of reboots which takes 5-7 minutes in all. (I was surprised, I assumed the rooting process would take longer.)

The quickest way to test for ‘root’ is to simply open up your Apps folder and see if a new app called ‘Superuser Permissions’ shows up. It has a picture of a ninja. If you see this, you’re rooted! Congratulations!

So, what’s next?

So you know that root has its benefits, but what should you do first? My opinion will vary from others, but then again you’re reading my blog, so you asked for it. 🙂

I would most certainly download Clockwork’s ROM Manager and perform your first nandroid backup. (Huh?) A nandroid backup is an exact file system copy of your phone (think .iso or CCC). It allows you to restore your phone (apps, settings, preferences, etc.) to that state in the future should you need to. It’s a good idea to have this ‘stock’ backup in case you FUBAR your phone with your newly granted Root rights and need to revert. There are plenty of instructions out there on how to Backup/Restore your phone using ROM manager.

Another Backup?

I also suggest people immediately download Titanium Backup (donate version) and backup their system & preferences with it as well. This may be redundant, but it also allows you to restore individual apps & settings in the future, should you need to.

Finally, if you haven’t already, download Appbrain’s app to your phone, create a free account, and sync your apps. If for some reason you lost your backups and has to reflash a stock ROM, you would lose all your settings but at least you could re-install all of your apps easily.

Next steps

So, now you’re all backed up. You probably want to start removing Bloatware and other preinstalled apps. In my opinion, Titanium Backup is the best option here. Once you donate, you get a Key to unlock features such as ‘freezing’ apps. While some apps can easily be deleted (Nascar on Sprint, Skype & VZNavigator on Verizon), others don’t like to be removed. Some applications like Friendstream.apk are used by other apps like Twitter and Facebook. For this reason, using TB to ‘Freeze’ these apps (basically renaming them to prevent them from loading) is a better option. This way they’re still on the phone if you decide you want to reenable them later.
(I actually mistakenly deleted FriendStream after my first root thinking that it was Footprints.apk. I had to reflash from my nandroid and then go through it all again; it cost me 3 hours or work but I was sure glad I had the nandroid!)

What about Wifi tethering?

Yes, after backups and removing bloatware, free wifi tethering is one of the greatest things about having a rooted device. Carriers charge between $20 and $30/month for 3G hotspot capabilities which seems erroneous since most smartphone plans make concessions for unlimited data.

There are a few ways to use free 3G hotspot (wifi tethering) and a Google search will bring you more info than what I can share. I will insert a few links to make things easier though:
Wireless Tether for Root (pre8) – This seems to be the crowd favorite right now for app-based tethering.
Verizon EPST hack – If you’re on Big Red, you may also want to read about this EPST hack. It’s fast, simple, and doesn’t require root or a 3rd party app. (Of course, I don’t condone breaching your contract, so only read about this. Never do it. Right Big Red?)

Next steps

So, you’re rooted, backed up, surfin’ the web for free…anything else? Of course! You’re just getting started. Lots of cool apps out there require root to run. A few of my faves include:

  • Screen Shot It: This app allows you to take those cool screen shots of your screen that you see when checking out forums. This particular one is paid, but allows for cropping and ‘shaking’ to capture. Great app.
  • Root Explorer: Also a paid app, this file explorer is granted SU access and can remount the drive from Read-Only to Read-Write quickly and easily. Very useful.

Closing Remarks

I hope this “What to do now that you’re rooted” guide helps. It certainly isn’t intended to be a How To guide of any sort…more like a roadmap for where to go next. Keep in mind that if you have a stable nandroid backup, you can experiment a good bit. Be careful what you uninstall and create new nandroid backups when you reach a point where you like your current build (i.e. after you remove bloatware and install your rooted apps.) It’s also a good idea to copy your nandroids off your SD card to your computer from time-to-time for safer storage.

Further reading

I didn’t get into the benefit of custom ROMs etc. in this short article; there are PLENTY of other write-ups out there on that topic. Here are a few other reads for you if you wanna dive in further.

Need more help?

If you still need help, many great supporters can always be found in the #unrevokedtest channel on Freenode IRC. Join from your favorite IRC client or via the web. I can typically be found under the handle “idowens”.

WHM & WordPress Tips & Tricks

In my day job, I work a lot with WordPress and lately we’ve been utilizing a VPS or Dedicated server for more labor-intensive needs when shared hosting won’t cut it. Further, this site you’re reading now, along with about 8 others I own, are currently hosted on a VPS I’ve had for about 6 months now.

During this time, I’ve learned a lot about server management from the Linux command line, WHM (Web Host Manager, for the uninitiated), and cPanel. Below are just a few of the more helpful things I’ve learned along the way.

WHM vs. cPanel

If cPanel is the user interface for managing you hosting account, think of WHM as the user interface for managing all of your cPanels. Most people won’t ever see/use WHM because with most shared hosting accounts, you don’t get WHM access. However, as soon as you purchase a VPS or Dedicated server, you’ll be provided WHM as a way to manager all of your sites on the server. Resellers are very used to WHM as they use it to manage their clients.

WHM doesn’t allow you to do anything you can’t do from the command line & an FTP client but it sure does make it easier and faster. The WHM interface is very cPanel-esque and once you learn where the main things are, it’s pretty simple.

~tilde access for temporary site access

One of the great things about setting up a shared hosting account and registering a new domain name is the fact that most hosts give you immediate access via the IP address followed by “/~account_name”. When I first began using my VPS, I noticed that this helpful option is turned off by default.

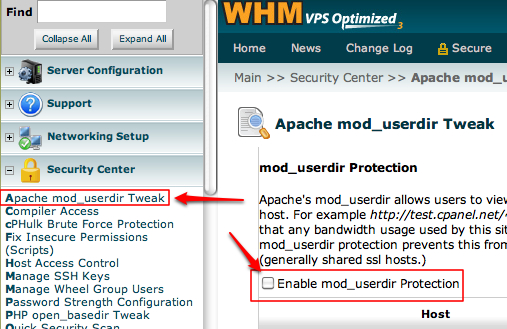
Turning it on is a really simple procedure. Basically the Apache module mod_userdir needs to be enabled. To do so, log into WHM, open the ‘Security Center’ tab in the sidebar, and click the first option, ‘Apache mod_userdir Tweak.’ Once there, uncheck the ‘Enable mod_userdir Protection’ box and viola! your /~username conventions will now work.

A note from the cPanel user manual: “Disabling this is desirable, as the bandwidth used when the site is accessed using this method is attributed to the web host’s main domain, skipping bandwidth monitoring systems.”

Whitelist IP addresses

When setting up a new site, or constructing one for a client, it’s not unusual to hit (that is, access) a site several hundred times an hour (esp. if you’re awful at CSS like me and need to refresh a lot.) Default firewalls are typically set to quickly lock users out for what looks like ‘spam’ OR if you happen to forget a password and attempt to login with the wrong credentials more than a few times.

To prevent this, it’s a good idea to quickly whitelist your IP address (at home and work) as well as any potentials clients who will be accessing the site a lot. To do do, go to the very bottom of the WHM sidebar and open the Plugins option, then ‘ConfigServer Security & Firewall’. Once there, look for the Green box that reads ‘Quick Allow’. Simple enter your IP addresses here, one by one, and click Quick Allow. You can also use wildcards here.

Set recursive php.ini location

Over and over, WordPress plugins require more that 8, 16, and even 32MB of PHP memory to run. Many hosts limit the ceiling of PHP memory allowed to 32 or 64MB (Midphase upped one of my accounts to 96MB upon request, but it took getting in touch with a System Admin. for the concession and I got a strong warning that if more than 7 processes used 96MB simultaneously, my account would be subject to suspension.)

Anywho, without getting into the details of the PHP.ini file and why it needs to be modified (that’s another post), in order to be truly useful, the newly created .ini file needs to be placed in EVERY directory on the server. That can be really tedious for many reasons. (1) It’s a pain to place it in every directory and (2) to make a change, one has to replaced it every directory. Fortunately there’s a solution that makes use of your .htaccess file.

Most WordPress users will only be familiar with their .htaccess file as it relates to their permalink structure as this is the file WordPress writes to for mod_rewrite rules. The .htaccess, among other things, is useful to creating permanant 301 redirects, custom rewrite rules, and setting the location of a ‘global’ .ini file.

I use the term ‘Global’ loosely as the VPS or Dedicated server’s PHP.ini file has the ‘ultimate’ ceiling defined but a local .ini file can up your limits to the max of what is allowed. So ‘global’ is the local sense. Confusing, I know.

Back to the helpful part: Rather than placing this file in every directory, simply place your PHP.ini file in a central locale and then add the following line to your .htaccess file:

SetEnv PHPRC /location/todir/containing/phpinifile

Notice that the command does NOT link to the actual .ini file but rather the directory in which the .ini file resides. Setting this value makes it easy to change, keeps you from having to place the .ini file in every directory, and finally, some areas in WordPress work much better with this line defined (For example, the Media Upload tool often doesn’t recognize an upload limit that has been raised from the 8MB initial limit to a newly defined 32MB.)

Closing remarks

These are just a few tips I’ve picked up in the last few months. When I have time, I’ll try to write a follow up article dedicated solely to the best practices for .htaccess files & PHP.ini files.

Clingo Phone Mounts

When I swapped from my Blackberry to an Android phone (Droid Incredible) I knew that I would be using the the Inc as my new GPS Navigation unit. See, about 3 weeks earlier I had flown to Raleigh, NC and I took my Telenav GPS unit so that I wouldn’t have to rent one from Hertz once I got there. Don’t get ahead of me. On the return trip, there was a mix up on my ticket and I almost didn’t make my return flight. Luckily I made it on board unscathed, but my baggage wasn’t so lucky…it was apparently dropped a few times making it from the ramp to the plane and when I got back home to Birmingham, I noticed that the touch screen was completely cracked, and, being out of warranty, I was completely out of luck.

So, back to the story. Knowing that I was planning on using my new phone as a GPS unit, I began looking for the right vehicle mount. Verizon provides one made for the Inc but it’s giant and definitely an eye sore. There are also other aftermarket car mounts with a various array of mounting options. Some mount to the windshield, some to the dash, and others on the AC vent. Of course, in the hot Alabama summers we have here, anything that would partially block the AC is a laughable proposition.

Most of the mounts were not ‘sexy’ to use a good geek term. They all looked big and clunky…not at all a good match for such a sleek phone. (This is one area what Apple outshines…mounts, cases, etc. for the iPhones are much hotter & more accessible..having said that, manufacturers have an easier time since with Apple products, there is typically just one form factor where with Androids, Blackberrys, etc. have many different sizes, shapes, etc.

After a bit more searching online, I ran across a product called Clingo, made but the well-know Allsop company. Clingo use standard bases for the desk, car, and neck (yes, neck) and then uses snap-on, lime-green sticky pads which the phone then adheres to. Sounds crazy, right?

I ordered a desk mount for the office as well as a car mount which easily swivels 360° so that I can easily rotate it for Navigation or for a larger keyboard when texting (at red lights, of course!) When the products arrives, the desk mount sticky pad was already coming apart…the pad was poorly glued to the base and since one has to literally ‘peel’ the phone off the pad, I knew this wouldn’t last very long. A quick call to Customer Service and they drop-shipped me a new pad for the desk mount and I’m pleased to say it was much much better quality.

All in all, I’m really pleased with the product. I should note that some phones don’t work well with the sticky pad method. For example, if you phone doesn’t have a ‘flat’ back…that is, if it is curved or has ridges like the Droid Incredible, it’s not going to stick very well. (I have a hard plastic case on my Inc which apparently is the absolute MOST adhesive thing for these sticky pads to stick to because it can tedious to remove at times.) Also, the latest iPhone 4 doesn’t stick really well to it. It may work fine for your desk but in the car, there’s too much vibration for it to stay on.

These mounts run between $30-40, depending on your setup. They’re available directly from the company and should soon be available in Best Buy, Radio Shack, and are now available online at Amazon. Also, if you’re using a clingo car mount with the Inc, be sure to pickup a right-angle micro-USB cable to keep the cord out of your way as you rotate it!

All of these items can be found in my Gear Guide Amazon Store where you’ll find products for your Droid Incredible. Check it out

Do you have any experience with the Clingo mount or other solutions? Be sure to share them with me!

Android / Droid Removable Drive Icons

I bought an HTC Droid Incredible last week and have had a lot of fun getting acclimated to it from the Blackberry Pearl that I was using before. The addition of Wifi, the large screen, and especially the apps, make this a HUGE upgrade and makes my former “smart” phone look pretty dumb.

One of the first tasks I was interested in was moving my media (images, ringtones [see previous post], etc.) from my Blackberry’s older 2GB SD card to my new 16GB SD card. So, I read up on how to mount the phone & SD card to my Mac and was off to the races. Something that bothered me from the get go was the fact that my Mac simply assigned both drives, which were both named ‘no name’, the default ‘Removable Drive’ icon. Not only was this ugly, but it also didn’t help me differentiate the two.

So, having the Type-A personality I do, I set out to set the world straight. I searched online for a few different drive icons that I liked, grabbed the Android Robot icon, and fired up Photoshop to make some edits. The finished product was 3 ‘droid branded drive icons which I could then assign to the internal phone memory and the removable SD card, with one to spare.

Here’s a preview of the set:

Android Drive Icons

If you’re interested, you can download the set below. The .ZIP includes:

  • The original droid robot icon @ 256×256
  • All 3 unbranded drives @ 256×256 in .PNG & .ICO formats
  • All 3 branded drives @ 256×256 in .PNG & .ICO formats
  • A ReadMe / License RTF

Download the free Android Drive Icons ZIP file.